Wednesday, December 15, 2010
Made with Love
Lisa and I put together this cute Christmas present, perfect for your co-workers, or a friend who enjoys the simple gift of creativity from the heart. We started out with a tube from SRM (once these came in the store we couldnt wait to get out hands on them) and dolled it up with some paper from the Basic Grey "Jovial" Collection, (my favorite christmas paper collection for 2010) the mitten and circles are cut out using Spellbinders, the stamp is Amuse from there 2010 winter collection, which I have already found countless possibilities for, since basically everything I make is made with love ;)
Projects with these tubes are endless, we visited the SRM blog: http://srm-stickers.blogspot.com/2010/11/tubes-day-one.html to get some ideas so we cannot take complete credit for this project, this is our version. Im looking forward to a "Girls Night" next wednesday and plan to make one of these for all the girls :)
Monday, November 22, 2010
Vintage Recipe Book Class
Wednesday, November 17, 2010
Last Friday I stayed for the "Scrap 'Till Midnight" at Picture This with some friends...if you havent ever been to one, your missing out! My friend Brittney is starting to get into Scrapbooking, she scrapped some recent pictures, Wedding, hunting, and family. and I made a couple pages and this card. I love Cosmo Cricket, especially this collection, "Girl Friday" the page is full of little squares with cute sayings and pictures on them, you could make about 20 different cards or so using one sheet of paper, I made this one also using pink glitter "thickers" and just rite stamps to spell out "Girls Night" hope you enjoy!
Wednesday, November 3, 2010
Wedding Card
Tuesday, October 19, 2010
Crafty Wedding Planner
Its quite aware that my blog has been a bit neglected. Between the Bridal Shower, Bachlorette Party,Scrap Pink, Wedding, Girls Weekend, and The Picture This bus trip last weekend, My Weekends have been pretty much swamped! The good thing is that the wedding planning stress is over, finals and mid-terms will be over tomorrow afternoon and Ill have more time to create. This post Id like to show you all the stuff I made for the wedding. I tried my best to save money by making as much on my own as I could. Starting with our invitations:
They sure were a lot of work, but worth it in the end, I got a ton of compliments and truly felt they turned out as beauriful as I'd hoped.
next was the boutineres (correct my spelling if Im wrong): This was Kevin's (my husband) his was a little bit larger than the rest of the guys' to seperate his as the groom. Not that the Ivory Tux while the rest of the guys wore brown tuxes didnt give it away, I thought the cattail was a cute, different take on a boutinere, and stayed in the "fall theme" we were going for.
This was my bouquet: the flowers and cattails were all bought seperate and we assembled them like so: the rest of the bridesmaids were the same but had all yellow flowers, this was my first time making flower bouquets, I think they turned out quite nice for a first timer ;)
Save The Dates:
Centerpieces, courtesy of Aunt Jayme :)
And last but not least, our card box. I wanted something completely differnt than the traditional "card box" so I called up my grandpa and asked if he could make me a barn box. I painted it will "crackle paint" to give it the rustic look, which is hard to see. and Paula let me use her Copic markers and airbrush system so airbrush the barn also. I think it turned out awesome. I had my bridesmaid Olivia paint our names and the doors on it.
I was very happy with the way everything turned out, and It was by far, the best day of my life, I married my bestfriend and had all my friends and family surrounding and supporting me. It was a beautiful day in Eleva, WI.
Wednesday, September 15, 2010
Fab Five
First off Id like appologize for this being late, Ive had a lot on my plate right now and have been juggling between school, work, and wedding planning (in about 20 days Ill have my life back ;)
This card was simple to make, the pendent was cut out from spellbinders, distressed with ink and layered. A flower was added for an accent in the middle of the pendant and this brand new ribbon we got a couple weeks ago at Picture This, I have noticed that it is already very popular with customers.
I used all Graphic 45 papers for the "Le Romantique" Collection for this card.
Thanks for stopping by my blog, enjoy the rest of the Fab Five Blogs this week for more Pendant Projects :)
Sunday, August 8, 2010
Yesterday was quite the eventful day, somehow noon managed to sneak up on me and then busy busy. Britt and I (my newly scrapbook crazed bestie) ran to Picture This to gather some supplies for our Saturday Projects (initial plans to head to the beach got clouded out) She started on a mini album of her Bahamas trip last month, and I started (and finished) my first chipboard album. Ive always wanted to do one, but lack of time lately has been crushing that dream of mine. but here it is: Eleva Broiler Fest Kickball Tournament 2010 :) or atleast these are a few of my favorite pages:
Wednesday, July 28, 2010
Amuse Christmas Card
I made this card as a sample during A*MUSE *A* PALOOZA! I also had plans to put it on my blog as soon as I could, but as you can see that didnt happen until now, when I first saw this tree stamp, I wasnt a huge fan, looking through the baskets of new stamps I came across this one that says "Christmas waves a magic wand over the world, and behold, everything is softer and more beautiful" and it hit me...thats exactly what this little poor tree needs, so I made a slider card, slide the bare tree up,and there its transformed into a beautiful Christmas tree, who knows this may have to by my Christmas Card this year.
Friday, July 23, 2010
Fab Five Day 5
Well here it is, the end of a fabulous week of Fab Five projects!! Todays product was the Spellbinders Tree, I made a small forest on the front of my card, distressed the trees a little bit, and stamped over with this Unity Stamp, "Do not go where the path may lead, go instead where thiser is no path and leave a trail" I thought it was catchy with the trail in the middle of my card :) he he. Have a good weekend everyone thanks or checking out my blog!
Wednesday, July 21, 2010
More Like Sisters
Fab Five Day 4
Todays product was a sheet MME diecuts from the "ooh la la" collection. I matched them up with coordinating paper, "Shabby CHic" MME, and added some gemstones, colored green to match with copic markers. Very simple and very cute, I love how girly this paper is!!
The pictures are my senior photo session with my bestfriend in 2007. enjoy!
Fab 5 Day 3
Todays product are these rub-ons from October Afternoon, I only used two, but trust me all in the package are super cute as well. I used Graphic 45 patterned paper for the background from the "baby 2 bride" collection and rubbed the rub-on "frame" over this picture of my great grandmother to make a cute keychain.
Tuesday, July 20, 2010
Fab Five Day Two
Monday, July 19, 2010
Fab 5 Day 1
Hello!! Back to another fun week of "Fab 5" enteries!! I hope everyone is having a fun summer, I know a lot of people leave there scrapbooking/card making for the winter months but I hope many of you are still checking out our blogs for inspiration and ideas. Today we were using GCD Paper with flowers all over it, I cut out the flowers (this was the longest part of making the card, but still not that strenuous, especially since I only cut out 5), "thanks" was cut out using cuttlebug, (I dont know if you can tell in the picture but I layered a green thanks on top of a pink thanks), green grass cut out using the "icicle" punch by Martha Stewart, and the fence was simply cut strips of white paper. There you have it! a cute thanks card!! thanks for stopping by at my blog, dont forget! If you leave a comment at anytime this week on any of our blogs you get entered in for a drawing of free goodies!!
Wednesday, July 7, 2010
Island Girl
I found this paper at work and thought it had instant/easy potential, 12x12 sheet of summer related squares such as this "Hula Championship" and others like "Jacks Crab Shack" & "Deep Blue Swim Club" so I distressed the edge a little, added some gems (colored green with my one and only copic marker)I colored the chipboard using ink pads and stamped the inside!
Little Boy Grandpa :)
Sunday, June 27, 2010
Friday, June 18, 2010
Fab Five Day Five
Our product for today was this ribbon, I started by finding cardstock that matched, I used cordinations paper for the yellow to give it some texture. I used the Daisy Bucket clear stamp "Mum Small" and stamped it on the blue with versa mark. The stamp on top is Unity Stamp Company, it comes in a Bundle Pack of neat quotes and of course I just had to have it!! And last but not least I put stickles on the flowers. Dont forget to leave a comment on any of our blogs to get entered for a prize drawing.
Thursday, June 17, 2010
Fab Five Day Four!
This was my favorite project this week, funny this paper was my least favorite to start out with and quickly grew on me with all its possibilities once I sat down with it.
This paper looked vintage to me with the writing on it so I leaned towards Graphic 45 papers and found this one that matched quite well. I also spritzed a little Tattered Angels on the flowers for a little sparkle but its not shown in the picture and colored the butterfly with copic marker.
Supplies:
Background paper ( Dream Street Papers: "{Miss}fit-Feisty" )
Stamp (all natural beauty clear stamp)
Flowers (Prima flower embellishments)
Diecut: Graphic 45 Le Romantique Collection,
Tuesday, June 15, 2010
Fab Five Day 3
Welcome to day three!! Today I made a bubble card, like a shaker card but without the shake :)I colored the seahorse with copic markers and glued to the inside of the plastic bubble, cut out the circle in the cardstock and patterned paper using nestibiliites the "lets hang out" was stamped on white cardstock and stuck behind the plastic to poke through between the seahorses and glossy accented the bubbles to give them a true "bubble look"
Fab Five Day 2
This card is pretty simple to make, I used black and yellow cardstock for the circles, Just Rite Stamps, Black Ribbon and of course our Fab Five Day Two paper, American Crafts Amplified "Boom Box"
Hope your having fun checking out our creations this week! dont forget, leave a comment and get entered into a drawing for a prize! :)
Monday, June 14, 2010
Save The World For Me
Hello and welcome to another week of Fab Five designs!! This wasnt my original idea for this paper, but its been a pretty busy/stressful week at the Deetz/Grambort residence. We've had some puppy trauma, our littlest one Bentley hit his head and had some brain trauma, he was at the vet all week but is safe at home now and making a good recovery! Im hoping once he doesnt need to be "babied" as much Ill have a little more time and will still be able to create my original plan :) which I was very excited about for the past two months, but this week always seems to come too quickly!
I found this picture of me holding my little brother the day he was born (lately Ive been reminiscing a lot about how things were so much simpler back then, and how nice it would be to only have to worry about what time Rugrats was on) lol but anyways I thought it fit well with the paper and saying "save the world for me" as his big sister I feel its my duty to make sure the world is just as beautiful now as it is when he grows up and has children of his own (wow thats a scary thought) if you know him you know he can be a little/big turd at times! My mother certainly has her hands full at times.
I cut out the trees for the bottom border and cut the strips saying "save the world for me" assembled with matching "Woodland Whimsy" critter stickers.
Sunday, June 6, 2010
Just a little something
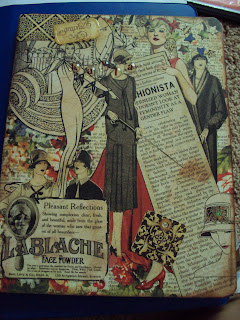
One of my bestfriends who is a little "less creative" as she states, came into the store and loved the Graphic 45 paper, so I put together a little easy-to-do project for us, we bought notebooks from walmart and covered them in Graphic 45 papers and die cuts, they both turned out really cute, here is mine:
Friday, May 14, 2010
Fab Five>>> Day 5
I LOVE STICKLES!!! So of course I had to use some for atleast one project. I was chatting with lisa at work and decided this paper looked like it could be "frosting" So I had her make me up a cupcake on our Pazzle Machine. The Jewl brad on top of the cupcake was used for the paper to swivel for a secret message underneath, HAPPY BIRTHDAY!
supplies: My Minds Eye Paper, purple, blue, and yellow stickles, jewl brad, Happy Birthday Stamp.
Thursday, May 13, 2010
Fab Five Day 4
Well hello day four! I hope you all are enjoying checking out our creative ideas :)
This project was pretty easy and quick to put together.
Supplies: My Minds Eye Paper, My Minds Eye tag (comes in 12x12 sheet of various die cuts and tags), Martha Stewart Punch,Just Rite Stamp, Tim Holtz Distress Ink "Fired Brick", nestabilities circle die, Deep Raspberry cardstock and matching ribbon, all at Picture This!
Tuesday, May 11, 2010
Fab 5 Day 3
Here it is, my Fab 5 Project Day 3:
When i first looked at this paper, I was at a loss, I had no idea what I could make of this paper, I actually got thursday and friday done before this project thats how at loss I was, but when I walked down the My Minds Eye aisle at Picture This, I pulled out this cute tag, grabbed a piece of matching paper, and just like that it came to me, it was so easy once I found these two other products, and that is my favorite thing about My Minds Eye Product, everything coordinates so perfectly, even when they aren't from the same collection. I added some twine and pearls and she was complete, enjoy!
Fab Five Day 2 :)
First of all Id like to let everyone know that my inspiration for this project was my good friend Brittney K. She is my little sunshine and the only person I know who can put a smile on her face when life throws her an unimaginable hardball, I love her dearly.
I used My Minds Eye Paper, and transperancy, "Christmas Red" Stickles over the word "shine" and glossy accents on the bird to make him pop out a little. Cuttlebug "Swiss Dots" on the sun and eylets. Hope you enjoy!
Monday, May 10, 2010
Fab 5 Day One
Here it is! My first Fab 5 project!
This flocked My Minds Eye Lush, "Pink Damask Paper" Screamed wedding to me, so I pulled out my Just Rite Wedding Stamp Set and got creative! If you havent noticed, Im kind of addicted to pearls and use them on practically everything, so of course I added a few pearls to this card to jazz it up, it is still pretty simple but with this beautiful paper, I didnt want to cover much of it up.
Thanks for checking out my blog, stay posted the rest of this week for more ideas, and dont forget leave a comment and get entered in for a drawing!!!
Wednesday, May 5, 2010
So Sophie
I love "My Minds Eye" so of course I had to go home and play with this new paper and diecuts as soon as it was in my hand, (So Sophie "Anything for You" Helpful Houndstooth Paper) my ispiration was GO GREEN!! especially since we've been getting so much rain lately in the wonderful state of Wisconsin, everything outside is turning to a beautiful shade :)As you can see, the picture is a little out dated, Im pretty sure this was in High School, at our "Wednesday-Night-Movie-Club Christmas Party"
Mothers Day Card
This mothers day card was made with Graphic 45 paper, I thought it would be perfect for my grandmother, good thing she isnt computer savy so I dont have to worry about her seeing it before hand ;) It is also in a mothers day card class that Lisa and I are teaching Thursday May 6th at 6pm at Picture This! call and sign up to make two beautiful cards, one for you mom one for your grandmother!
Tuesday, May 4, 2010
While the men are away the girls will play...
Monday, April 26, 2010
Finally!!
Ahhh....so I finally have a blog, with a NAME!! lets see how long I can keep it without changing it :)
Subscribe to:
Posts (Atom)